The Herschel Experiment
Purpose
To perform a version of the experiment of 1800, in which a form of radiation other than visible light was discovered by the famous astronomer Sir Frederick William Herschel.
Materials
- One glass prism (plastic prisms do not work well for this experiment)
- Three alcohol thermometers
- Black paint or a permanent black marker
- Scissors or a prism stand
- Cardboard box (photocopier paper box works well)
- 1 blank sheet of white paper
Resources
Background
Herschel discovered the existence of infrared light by passing sunlight through a glass prism in an experiment similar to the one we describe here. As sunlight passed through the prism, it was dispersed into a rainbow of colors called a spectrum. A spectrum contains all of the visible colors that make up sunlight. Herschel was interested in measuring the amount of heat in each color and used thermometers with blackened bulbs to measure the various color temperatures. He noticed that the temperature increased from the blue to the red part of the visible spectrum. He then placed a thermometer just beyond the red part of the spectrum in a region where there was no visible light and found that the temperature was even higher! Herschel realized that there must be another type of light beyond the red, which we cannot see. This type of light became known as infrared. Infra is derived from the Latin word for "below." Although the procedure for this activity is slightly different than Herschel's original experiment, you should obtain similar results. For more background information, see Herschel's Experiment.

Preparation
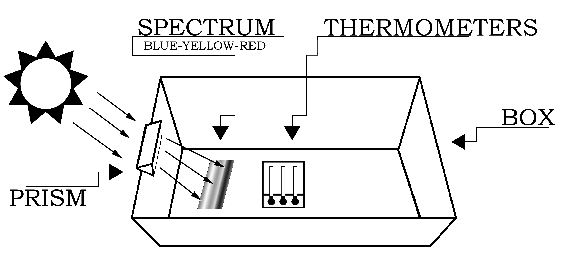
You will need to blacken the thermometer bulbs to make the experiment work effectively. One way to do this is to paint the bulbs with black paint, covering each bulb with about the same amount of paint. Alternatively, you can also blacken the bulbs using a permanent black marker. (Note: the painted bulbs tend to produce better results.) The bulbs of the thermometers are blackened in order to better absorb heat. After the paint or marker ink has completely dried on the thermometer bulbs, tape the thermometers together such that the temperature scales line up as in Figure 1.
A teacher who tried this experiment, C. Zetie, also shared the following note: "If you are using low-priced classroom thermometers, you may have to calibrate them to get consistent readings between thermometers. For example, compare them in the shade to a higher quality thermometer, or if none available, to a room thermostat, which will generally be accurate to within 1 degree. If you are using card-mounted thermometers, you can mark the correction for each thermometer directly on the card. This will ensure consistent readings within each experiment as well as between students."
Procedure

The experiment should be conducted outdoors on a sunny day. Variable cloud conditions, such as patchy cumulus clouds or heavy haze will diminish your results. The setup for the experiment is depicted in Figure 1. Begin by placing the white sheet of paper flat in the bottom of the cardboard box. The next step requires you to carefully attach the glass prism near the top (Sun-facing) edge of the box.
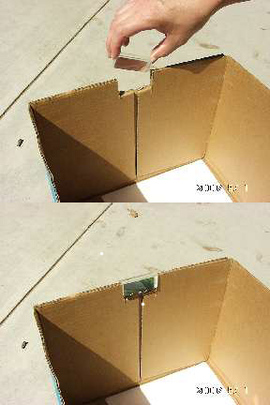
If you do not have a prism stand (available from science supply stores), the easiest way to mount the prism is to cut out an area from the top edge of the box. The cutout notch should hold the prism snugly, while permitting its rotation about the prism's long axis (as shown in Figure 2). That is, the vertical "side" cuts should be spaced slightly closer than the length of the prism, and the "bottom" cut should be located slightly deeper than the width of the prism. Next, slide the prism into the notch cut from the box, and rotate the prism until the widest possible spectrum appears on a shaded portion of the white sheet of paper at the bottom of the box.

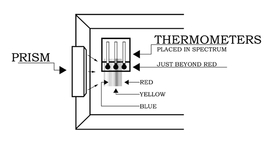
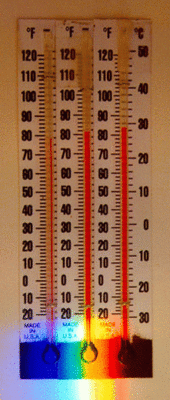
The Sun-facing side of the box may have to be elevated (tilted up) to produce a sufficiently wide spectrum. After the prism is secured in the notch, place the thermometers in the shade and record the ambient air temperature. Then place the thermometers in the spectrum such that one of the bulbs is in the blue region, another is in the yellow region, and the third is just beyond the (visible) red region (as in Figure 3). Note: Depending on the position of the prism relative to the Sun, the colors of the spectrum may be reversed from what is show in the figures.
It will take about five minutes for the temperatures to reach their final values. Record the temperatures in each of the three regions of the spectrum: blue, yellow, and "just beyond" the red. Do not remove the thermometers from the spectrum or block the spectrum while reading the temperatures.

Calculations
See the student worksheet for tables for filling in all the values below.
- Compute the differences between the final temperatures measured in the spectrum and the temperatures measured in the shade for the three thermometers.
- Calculate the differences between the final temperatures in each part of the spectrum.
- Compute the average final temperature measured by the class in each part of the spectrum.
Questions/Discussion
What did you notice about your temperature readings? Did you see any trends? Where was the highest temperature? What do you think exists just beyond the red part of the spectrum? Discuss any other observations or problems.
Teacher Notes
Have the students answer the above questions. The temperatures of the colors should increase from the blue to red part of the spectrum. The highest temperature should be just beyond the red portion of the visible light spectrum. This is the infrared region of the spectrum. Herschel's experiment was important not only because it led to the discovery of infrared light, but also because it was the first time that it was shown that there were forms of light that we cannot see with our eyes. As we now know, there are many other types of electromagnetic radiation ("light") that the human eye cannot see (including X-rays, ultraviolet rays and radio waves). You can also have the students measure the temperature of other areas of the spectrum including the area just beyond the visible blue. Also, try the experiment during different times of the day; the temperature differences between the colors may change, but the relative comparisons will remain valid.
Published: 26 January, 2022

