The Ritter Experiment
Purpose
To perform a version of the experiment of 1801, in which ultraviolet light was first discovered by Johann Wilhelm Ritter.
Materials
One glass prism, blueprint paper, household ammonia, warm water, one small and shallow square pan, a piece of cardboard slightly larger than the pan, water, a thin black marker, a prism stand or a cardboard box (a photocopier paper box works fine), scissors, a ruler, one blank sheet of white paper, and tape. NOTE: BLUEPRINT PAPER IS EXTREMELY SENSITIVE TO LIGHT - KEEP IT IN A DARK AREA UNTIL IT IS PLACED IN THE SPECTRUM PRODUCED BY THE PRISM IN THE EXPERIMENT!
NOTE: This experiment uses ammonia to develop blueprint paper. The ammonia should handled by an adult only. To reduce the ammonia vapors and increase safety, we conducted a test to determine the amount by which the ammonia could be diluted and still effectively develop the blueprint paper within a reasonably short time. Our results showed that a mixture of 90% very warm water and 10% ammonia works very well for blueprint paper exposed to its vapors for 90 seconds.
For the best results, read the PREPARATION and PROCEDURE sections carefully before attempting this experiment. Teachers should try this experiment first before having their students perform it.
Resources
Background
Johann Wilhelm Ritter was born in 1776 in Samitz, Silesia, which is now part of Poland. He worked as a pharmacist between 1791 and 1795 and then attended the University of Jena to study science and medicine. While at the University, Ritter performed numerous experiments.
Johann Ritter is best known for his discovery of ultraviolet light in 1801. A year earlier, in 1800, William Herschel discovered infrared light. This was the first time that a form of light beyond visible light had been detected. After hearing about Herschel's discovery of an invisible form of light beyond the red portion of the spectrum, Ritter decided to conduct experiments to determine if invisible light existed beyond the violet end of the spectrum as well.
In 1801, he was experimenting with silver chloride, a chemical which turned black when exposed to sunlight. He had heard that exposure to blue light caused a greater reaction in silver chloride than exposure to red light. Ritter decided to measure the rate at which silver chloride reacted when exposed to the different colors of light. To do this, he directed sunlight through a glass prism to create a spectrum. He then placed silver chloride in each color of the spectrum. Ritter noticed that the silver chloride showed little change in the red part of the spectrum, but increasingly darkened toward the violet end of the spectrum. This proved that exposure to blue light did cause silver chloride to turn black much more efficiently than exposure to red light.
Johann Ritter then decided to place silver chloride in the area just beyond the violet end of the spectrum, in a region where no sunlight was visible. To his amazement, he saw that the silver chloride displayed an intense reaction well beyond the violet end of the spectrum, where no visible light could be seen. This showed for the first time that an invisible form of light existed beyond the violet end of the spectrum. This new type of light, which Ritter called Chemical Rays, later became known as ultraviolet light or ultraviolet radiation (the word ultra means beyond). Ritter's experiment, along with Herschel's discovery, proved that invisible forms of light existed beyond both ends of the visible spectrum.After his discovery of ultraviolet light, Ritter continued to do research and became increasingly interested in electrical experiments. He had discovered the process of electroplating earlier in 1800. In 1802, he invented the dry cell battery and later developed a storage battery in 1803. In 1804 he began work at the Bavarian Academy of Science in Munich where he remained until his death in 1810 at the age of 33.
We now use ultraviolet light in many ways. In medicine, ultraviolet light is used to help kill bacteria and viruses and to sterilize equipment. It is used to disinfect products and containers. In science, ultraviolet light is used to study atoms, and to learn about the warmer objects in space. Several animals, including birds, butterflies and other insects can see ultraviolet light.
Preparation
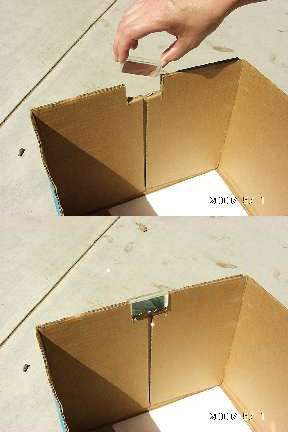
This experiment should be conducted outdoors on a sunny day. Variable cloud conditions, such as patchy cumulus clouds or heavy haze will diminish your results. In a very dimly lit area cut out a piece of blueprint paper which is slightly larger than the small, shallow pan and at least 4x4 inches (or 10x10 cm) in area. Keep the piece of blueprint paper out of the light until needed. If you do not have a prism stand (available from science supply stores), the easiest way to mount the prism is to cut out an area from the top edge of the cardboard box. The cutout notch should be able to hold the prism snugly, while permitting its rotation about the prism's long axis (as shown in Figure 2 below). That is, the vertical "side" cuts should be spaced slightly closer than the length of the prism, and the "bottom" cut should be located slightly deeper than the width of the prism. Next, cut out a piece of cardboard which is slightly larger than your piece of blueprint paper.

Procedure

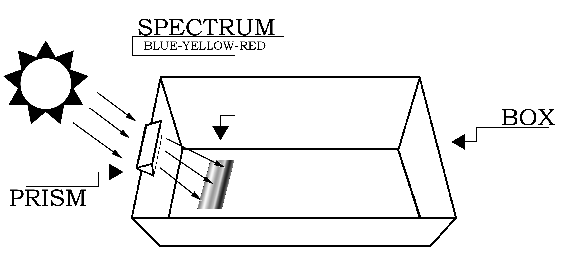
The setup for the experiment is depicted in Figure 1. Begin by placing the white sheet of paper flat in the bottom of the cardboard box. This will help you see the colors of the spectrum more clearly. The next step requires you to carefully attach the glass prism near the top (Sun-facing) edge of the box. If you do not have a prism stand, slide the prism into the notch cut from the cardboard box, and rotate the prism until the widest possible spectrum appears on a shaded portion of the white sheet of paper at the bottom of the box. [To see images showing the setup, click here.] The Sun-facing side of the box may have to be elevated (tilted up) to produce a sufficiently wide spectrum.
Without exposing the blueprint paper to direct sunlight, quickly place it in the bottom of box, where the spectrum is visible, with the colored side of blueprint paper facing up (exposed to the spectral colors). Be sure to have a large section of the blueprint paper in the area past the blue-violet portion of the spectrum. Tape the paper down at the corners to keep it from moving (this is easier if the tape is already in place on the blueprint paper before placing it in the spectrum). Immediately afterward, while being very careful not to move the box or the blueprint paper, use a thin marker to draw an outline on the blueprint paper around the visible part of the spectrum created by the prism. Label the violet end of the spectrum with a "V". Leave the paper in the box, exposed to the spectrum, for about 30 seconds. Then carefully remove the paper and try not to expose it to sunlight during the process.
Bring the piece of blueprint paper to a well ventilated area. Here pour a mixture of 90% very warm water and 10% ammonia into the pan to a depth of about 1 centimeter. NOTE: The mixing and pouring of the ammonia mixture should be done by a teacher, parent or other adult. Place the blueprint paper across the top of the pan with the colored side of the paper facing the pan and cover it and the entire pan with the piece of cardboard. Do not let any of the ammonia mixture come into contact with the blueprint paper. The cardboard will help contain the ammonia fumes and will decrease the development time. Keep the paper in place above the pan for about 90 seconds.
Once the blueprint paper is developed, move to a location away from the ammonia and study your results. There should be a white (or light-colored) rectangle around the area where the blueprint paper was exposed to the solar spectrum. The white area should be surrounded by a much darker region. You should notice that the area which was exposed to the red end of the spectrum is not as lightly colored as the area exposed to the violet region. Most importantly, you should notice that the light-colored area of the blueprint paper extends far beyond the line marking the violet end of the spectrum. This is the region that was exposed to invisible ultraviolet light.
Using a ruler, measure the marked width of the visible spectrum. Then measure how far the light-colored region of the blueprint paper extends beyond the line marking the violet end of the spectrum. Add these two numbers to compute the total width of the exposed region. Compare your results to those of your classmates and compute average values for the class.
Published: 26 January, 2022

